U-NET Model Implementation and SAM (Segment Anything Model) exploration

The topic of this post generated from a need of mine to find a way of removing background in specific type of images. I had not really any extensive experience with Image Segmentation and had to investigate possible ways to achieve this in an automated way. While looking for a solution I came across rembg which is a Python library that removes background from an image and keeps the primary subject(s) very neatly. The library is based on U2NET which is a more recent version of U-NET that came out in 2015. I wanted to learn more about this topic so in this blog post I will talk about the UNET model architecture and implementation in PyTorch. But that’s not all. Last week FAIR released SAM - Segment Anything Model. This new model is absolutely mind-blowing and in this post I will also show couple of example on how to use it and off the bat results on random images.
UNET Architecture
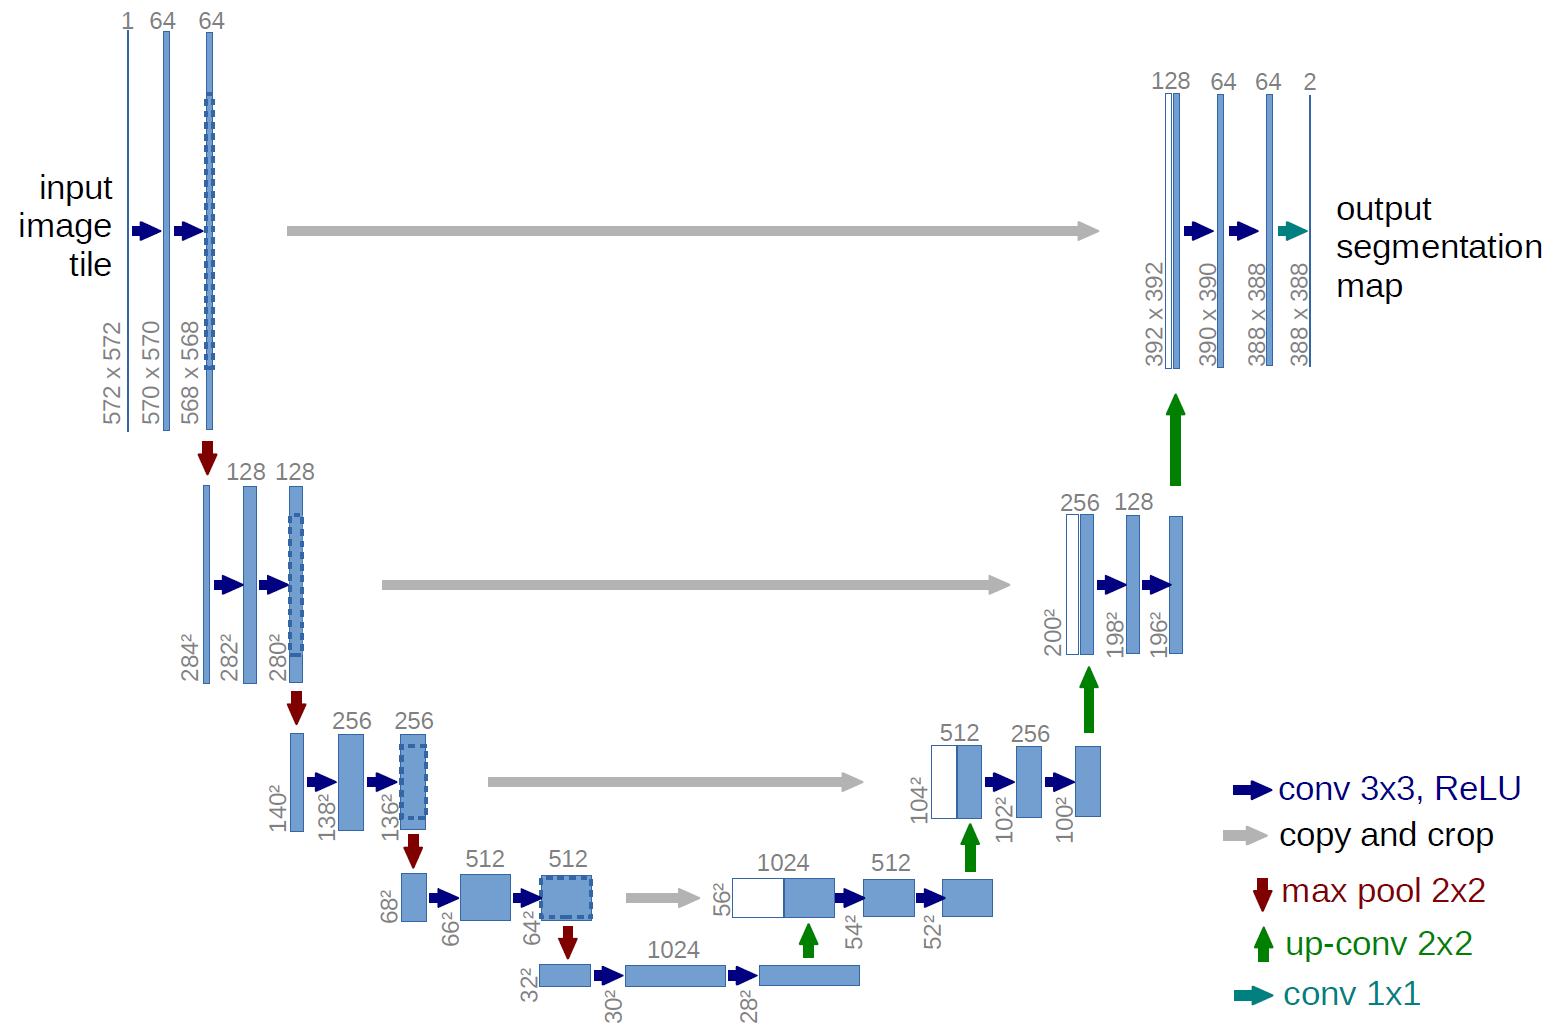
Image taken from the original paper here: https://arxiv.org/abs/1505.04597
The U-NET architecture is a popular convolutional neural network (CNN) architecture that was introduced in 2015 by Olaf Ronneberger, Philipp Fischer, and Thomas Brox. It was originally designed for biomedical image segmentation tasks, but has since been used for a wide range of image segmentation tasks in various fields.
The U-NET architecture consists of two parts: an encoder and a decoder. The encoder is a series of convolutional and pooling layers that downsample the input image, while the decoder is a series of upsampling and convolutional layers that reconstruct the original image size from the smaller representation produced by the encoder. The name itself is given because of a U shape neural network.
The main improvements that the U-NET paper brought to the field of image segmentation include:
Skip connections: The U-NET architecture introduced skip connections between the encoder and decoder layers. These connections allow the decoder to access features from earlier layers of the encoder, which helps the model retain more detailed information during upsampling.
Symmetric architecture: The U-NET architecture has a symmetric structure, which allows the model to learn both global and local features at different scales of the image.
Data augmentation: The U-NET paper introduced a variety of data augmentation techniques to improve the generalization of the model, including rotation, scaling, and elastic deformations.
Training on small datasets: The U-NET architecture was shown to be effective even when trained on small datasets, which is important for biomedical image segmentation tasks where large annotated datasets may not be available.
For the code implementation of the U-NET architecture, I did a fews changes from the original implementation, such as adding BachNorm2d (it came out after 2015).
U-NET Model Implementation in PyTorch
import torch
import torchvision.transforms.functional as F
import torch.nn as nn

FEATURES = [64, 128, 256, 512]

class PairConv(nn.Module):

    def __init__(self, in_channels, out_channels):
        super(PairConv, self).__init__()
        self.conv = nn.Sequential(
                nn.Conv2d(in_channels,
                          out_channels,
                          kernel_size = 3,
                          stride = 1,
                          padding = 1,
                          bias = False),
                nn.BatchNorm2d(out_channels),
                nn.ReLU(inplace = True),
                nn.Conv2d(out_channels,
                          out_channels,
                          kernel_size = 3,
                          stride = 1,
                          padding = 1,
                          bias = False),
                nn.BatchNorm2d(out_channels),
                nn.ReLU(inplace = True)
            )

    def forward(self, x):
        return self.conv(x)

class UNET(nn.Module):

    def __init__(self, in_channels = 3, out_channels = 1, features = FEATURES):
        super(UNET, self).__init__()
        self.contracting_path = nn.ModuleList()
        self.expansive_path = nn.ModuleList()
        self.max_pool = nn.MaxPool2d(kernel_size = 2, stride = 2)

        for feature in features:
            self.contracting_path.append(PairConv(in_channels, feature))
            in_channels = feature

        for feature in reversed(features):
            self.expansive_path.append(
            nn.ConvTranspose2d(
                            feature*2,
                            feature,
                            kernel_size= 2,
                            stride = 2
                        )
                )
            self.expansive_path.append(PairConv(feature * 2, feature))

        self.bottom = PairConv(features[-1], features[-1] * 2)
        self.out_conv = nn.Conv2d(features[0], out_channels,kernel_size = 1)

    def forward(self, x):

        skip_connections = []

        for down in self.contracting_path:
            x = down(x)
            skip_connections.append(x)
            x = self.max_pool(x)

        x = self.bottom(x)
        skip_connections = skip_connections[::-1]

        for idx in range(0, len(self.expansive_path), 2):
            x = self.expansive_path[idx](x)
            skip_connection = skip_connections[idx//2]

            if x.shape != skip_connection.shape:
                x = F.resize(x, size=skip_connection.shape[2:])

            concat_skip = torch.cat((skip_connection, x), dim=1)
            x = self.expansive_path[idx+1](concat_skip)

        return self.out_conv(x)

x = torch.randn((1, 1, 180, 180))
model = UNET(in_channels=1, out_channels=1)
preds = model(x)
print(preds.shape)
print(x.shape)
assert preds.shape == x.shape


torch.Size([1, 1, 180, 180])
torch.Size([1, 1, 180, 180])
Note: in the original paper the output and input did not match in shape while in this implementation they do.
SAM, the GPT of Image Segmentation?
Segment Anything Model was introduced just few days ago by Facebook. The model is available on GitHub and after trying the online demo I had to give a better look at its capabilities as the results are just amazing. The first thing that I asked myself while trying SAM out was “is this the GPT of Image Segmentation?”.
SAM’s architecture consists of an image encoder, a prompt encoder, and a mask decoder. SAM is built on the Vision Transformer architecture. To use SAM locally is very simple and the GitHub repo has very detailed instructions on how to use it so I will not list the same information here. Below are some examples I ran locally.
SAM Examples
import numpy as np
import torch
import matplotlib.pyplot as plt
import cv2

#FROM REPO
def show_mask(mask, ax, random_color=False):
    if random_color:
        color = np.concatenate([np.random.random(3), np.array([0.6])], axis=0)
    else:
        color = np.array([30/255, 144/255, 255/255, 0.6])
    h, w = mask.shape[-2:]
    mask_image = mask.reshape(h, w, 1) * color.reshape(1, 1, -1)
    ax.imshow(mask_image)

def show_points(coords, labels, ax, marker_size=375):
    pos_points = coords[labels==1]
    neg_points = coords[labels==0]
    ax.scatter(pos_points[:, 0], pos_points[:, 1], color='green', marker='*', s=marker_size, edgecolor='white', linewidth=1.25)
    ax.scatter(neg_points[:, 0], neg_points[:, 1], color='red', marker='*', s=marker_size, edgecolor='white', linewidth=1.25)

def show_box(box, ax):
    x0, y0 = box[0], box[1]
    w, h = box[2] - box[0], box[3] - box[1]
    ax.add_patch(plt.Rectangle((x0, y0), w, h, edgecolor='green', facecolor=(0,0,0,0), lw=2))

def show_anns(anns):
    if len(anns) == 0:
        return
    sorted_anns = sorted(anns, key=(lambda x: x['area']), reverse=True)
    ax = plt.gca()
    ax.set_autoscale_on(False)
    polygons = []
    color = []
    for ann in sorted_anns:
        m = ann['segmentation']
        img = np.ones((m.shape[0], m.shape[1], 3))
        color_mask = np.random.random((1, 3)).tolist()[0]
        for i in range(3):
            img[:,:,i] = color_mask[i]
        ax.imshow(np.dstack((img, m*0.35)))
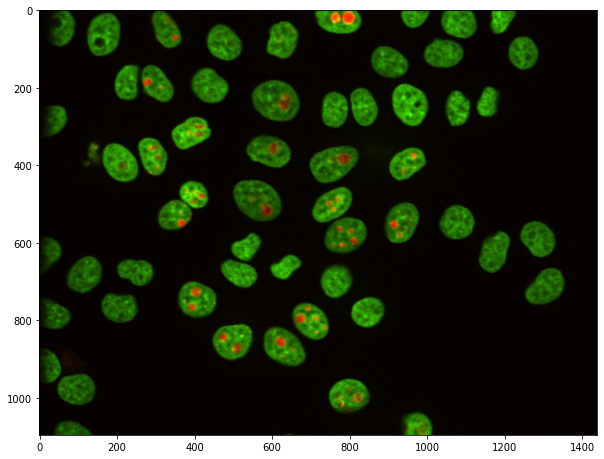
Since UNET was related to the biomedical sector, I tested SAM on some cells images
image = cv2.imread('cells.jpg')
image = cv2.cvtColor(image, cv2.COLOR_BGR2RGB)
plt.figure(figsize=(10,10))
plt.imshow(image)
plt.axis('on')
plt.show()
Now let’s import the weights, I used the larger checkpoint.
from segment_anything import sam_model_registry, SamPredictor, SamAutomaticMaskGenerator

sam_checkpoint = "sam_vit_h_4b8939.pth"
model_type = "vit_h"

device = "cuda"

sam = sam_model_registry[model_type](checkpoint=sam_checkpoint)
sam.to(device=device)

predictor = SamPredictor(sam)
predictor.set_image(image)
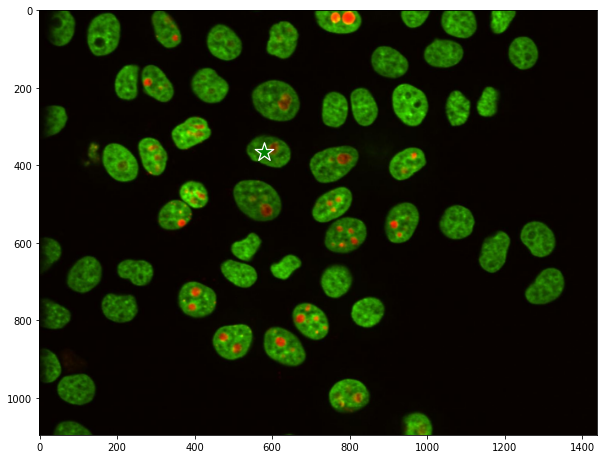
Let’s add a point on the image to tell the model what to segment, basically imitating a mouse click to get the coordinates on the image.
input_point = np.array([[580, 365]])
input_label = np.array([1])

plt.figure(figsize=(10,10))
plt.imshow(image)
show_points(input_point, input_label, plt.gca())
plt.axis('on')
plt.show()
Now that we have the selected item let’s run SAM with defaults.
masks, scores, logits = predictor.predict(
    point_coords=input_point,
    point_labels=input_label,
    multimask_output=False,
)

print(masks)
The shape of the masks is (1, 1096, 1440). Let’s have a look at the mask.
for i, (mask, score) in enumerate(zip(masks, scores)):
    plt.figure(figsize=(10,10))
    plt.imshow(image)
    show_mask(mask, plt.gca())
    show_points(input_point, input_label, plt.gca())
    plt.title(f"Mask {i+1}, Score: {score:.3f}", fontsize=18)
    plt.axis('off')
    plt.show()
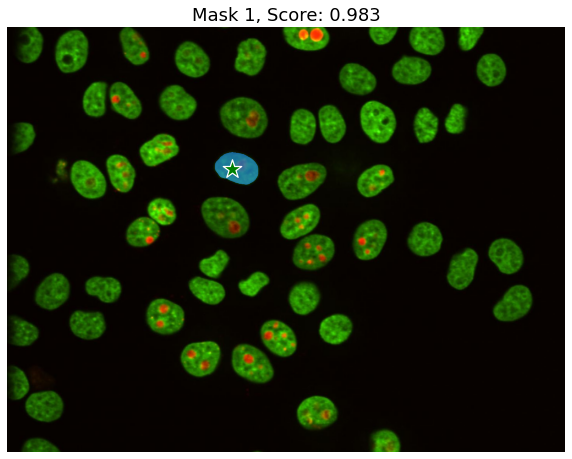
By simplying giving a coordinate within the are I wanted to segment, the model was able to perfectly generate the mask for it. Now, you can also do a auto-mask which will detect automatically any element that can be segmented in the image. There are two ways to do this. Either by using the default settings or by tweaking the hyperparameters, depending on the results you need, this may be needed. Examples:
mask_generator = SamAutomaticMaskGenerator(sam)
masks = mask_generator.generate(image)
plt.figure(figsize=(20,20))
plt.imshow(image)
show_anns(masks)
plt.axis('off')
plt.show()
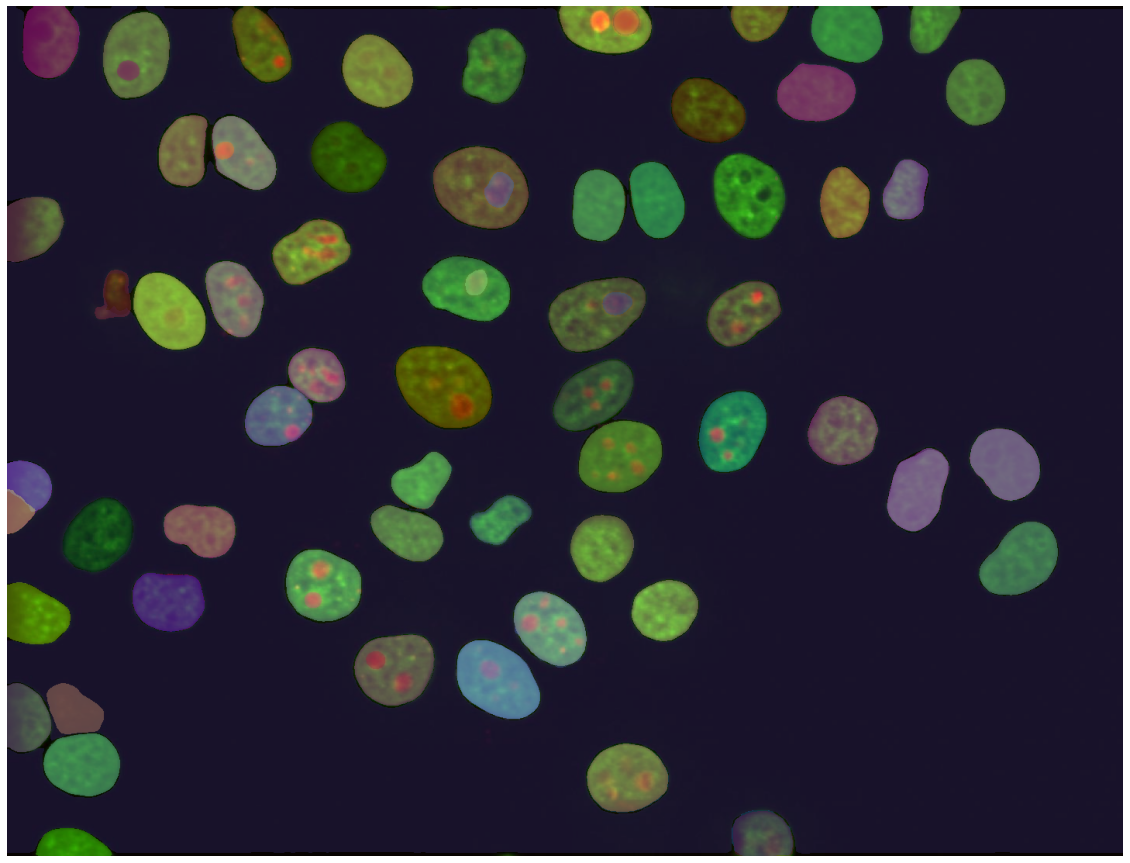
It may not be too clear from this image but the model was able to segment pretty well almost all elements in the image. By looking at the length of the masks, it is 92. SAM did 92 masks on this image. Let’s try to tweak the parameters of the SamAutomaticMaskGenerator class.
custom_mask_generator = SamAutomaticMaskGenerator(
    model=sam,
    points_per_side=32,
    pred_iou_thresh=0.86,
    stability_score_thresh=0.92,
    crop_n_layers=1,
    crop_n_points_downscale_factor=2,
    min_mask_region_area=100,
)

masks_2 = custom_mask_generator.generate(image)

plt.figure(figsize=(20,20))
plt.imshow(image)
show_anns(masks_2)
plt.axis('off')
plt.show()

print(len(masks_2))
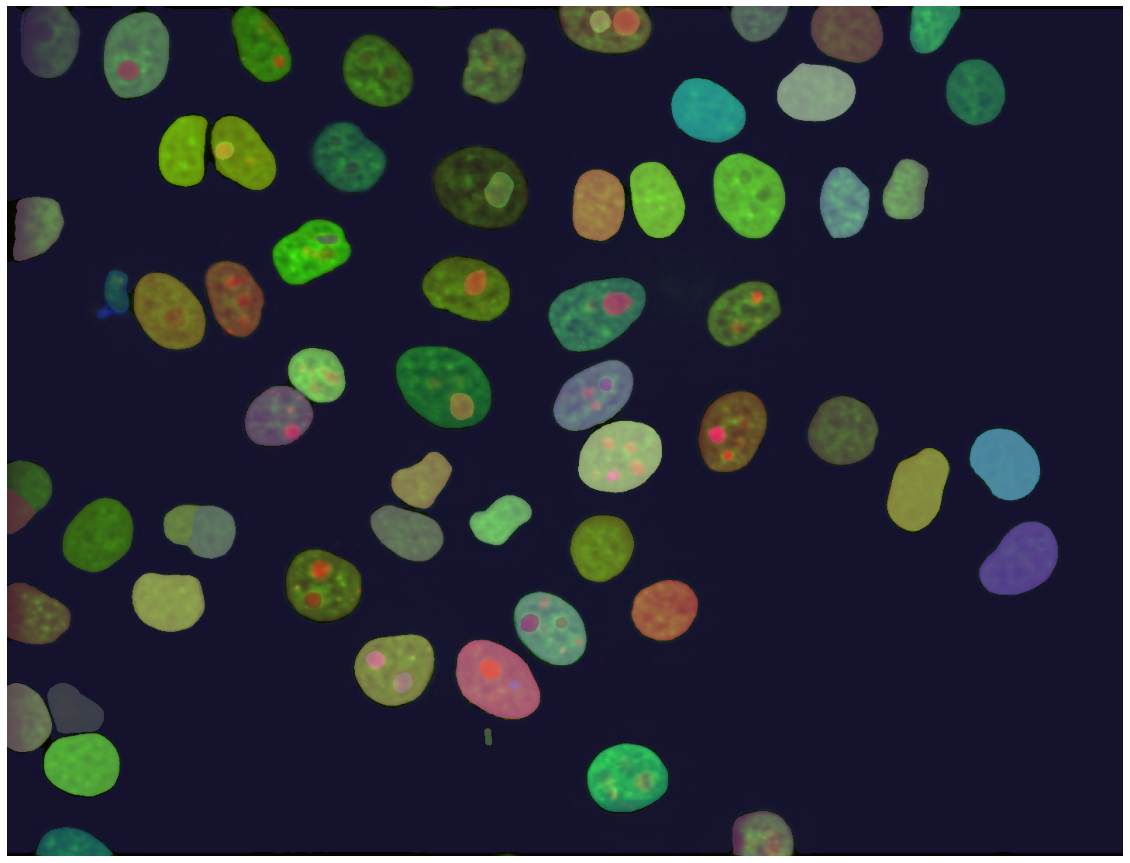
The number of masks is now 109 and you can definitely see that there are more elements detected, which could be wrong detection, depending on the target of the segmentation. This is of course depending on what parameters are used.
Just for fun, let’s try to segment myself:
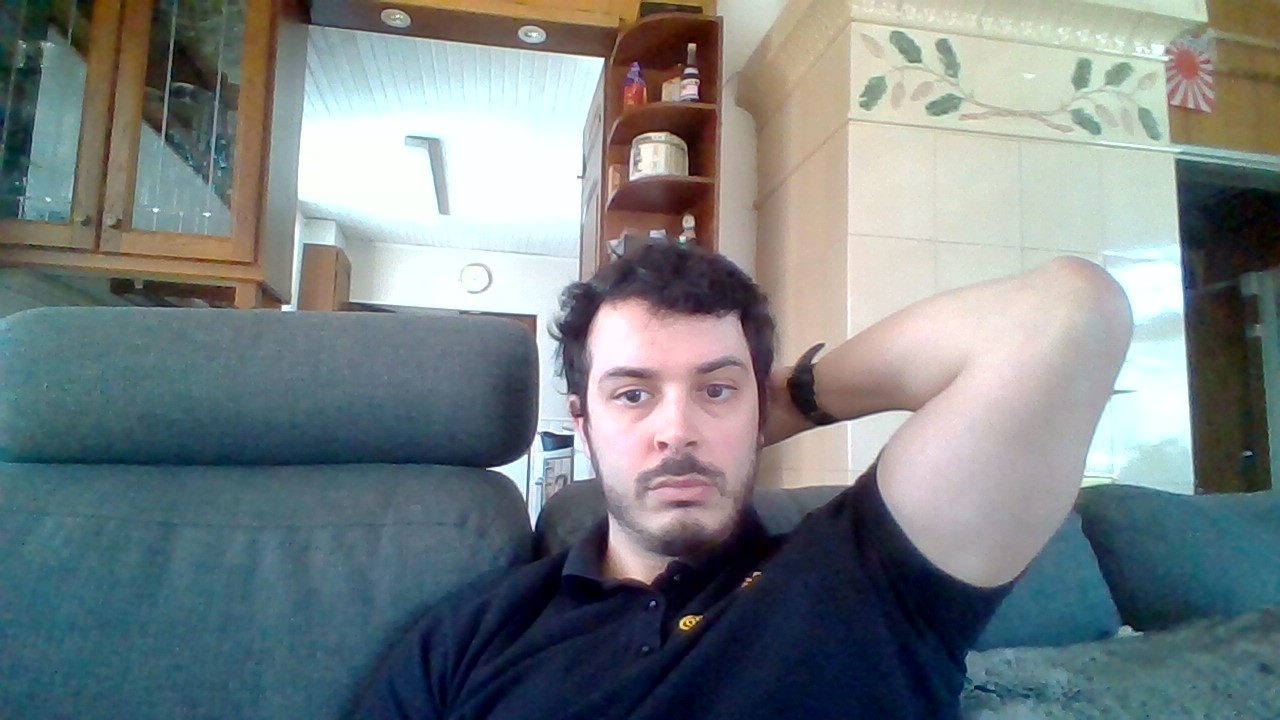
Quite impressive how many elements it detected automatically.
Create your own Mask Generator with Gradio
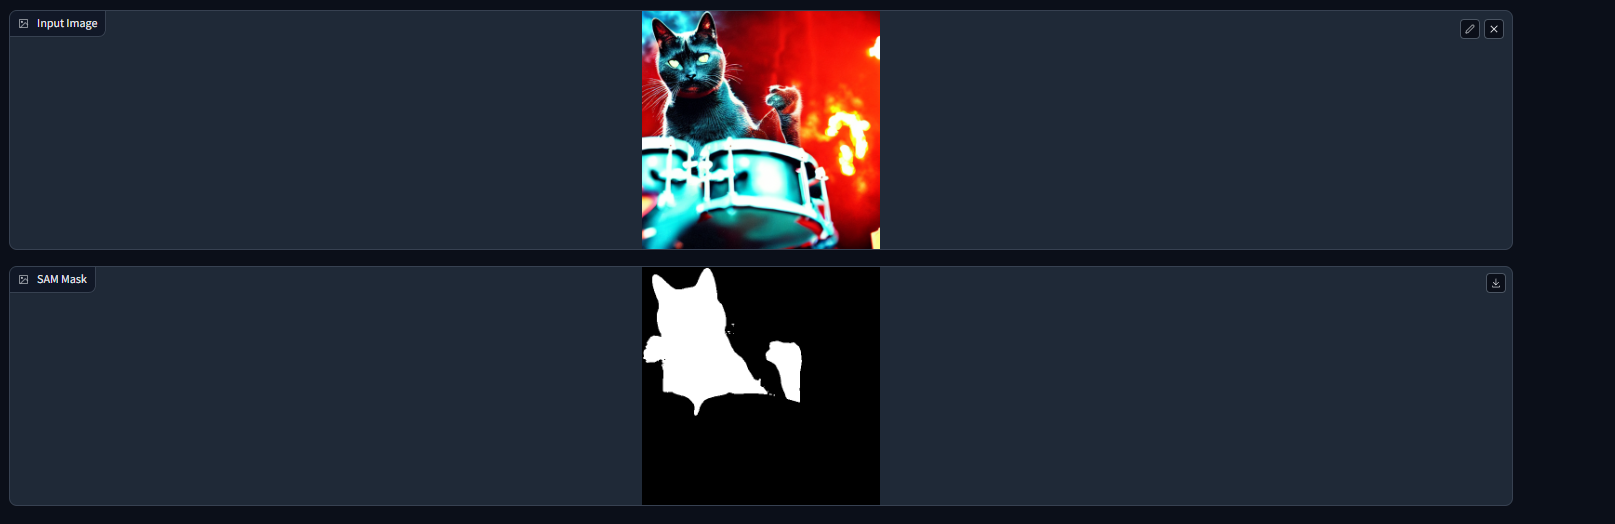
From the examples above it is obvious that it is not practical to select a point from a matplotlib graph. The demo available lets you test out a very nice UI that works with SAM in the background. I am not a web developer but what if I wanted to create my own mask generator GUI, would it be possible to create it with relative ease? Well, here comes Gradio to the rescue.
import gradio as gr
import numpy as np
from PIL import Image
from segment_anything import sam_model_registry, SamPredictor


def load_SAM(sam_checkpoint: str,
             model_type: str,
             device: str) -> SamPredictor:
    """Load SAM Predictor"""

    sam = sam_model_registry[model_type](checkpoint=sam_checkpoint)
    sam.to(device=device)
    predictor = SamPredictor(sam)

    return predictor


sam_predictor = load_SAM("sam_vit_h_4b8939.pth", "vit_h", "cuda")

selected_pixels = []

with gr.Blocks() as ui:
    in_image = gr.Image(label="Input Image")
    mask_image = gr.Image(label="SAM Mask")

    def create_mask(image: np.ndarray, event: gr.SelectData) -> Image:
        """Function to create mask with SAM"""
        selected_pixels.append(event.index)
        sam_predictor.set_image(image)
        point_coords = np.array(selected_pixels)
        point_labels = np.ones(point_coords.shape[0])
        mask, _, _ = sam_predictor.predict(
            point_coords = point_coords,
            point_labels = point_labels,
            multimask_output=False
        )
        mask = Image.fromarray(mask[0, :, :])
        return mask

    def reset_annotation() -> None:
        """Reset annotations done so far"""
        selected_pixels = []

    with gr.Row():
        reset_selected_pixels = gr.Button(value="Reset annotations")

    in_image.select(create_mask, [in_image], [mask_image])
    reset_selected_pixels.click(reset_annotation)


if __name__ == "__main__":
    ui.launch()
The concept is really basic. We have an input image. With the “select” feature we are able to catch the clicked index and feed it to the SAM predictor. For the point_coords we will pass the numpy array of the selected pixels and as point_labels an array of 1s with the shape of point_coords. For this particular case, we are setting the multimask to False to get just 1 mask in return. Once the mask is available, it is converted to a PIL image with the fromarray method.
There is a reset button to remove the annotations done so far. This is just a simple app and can be further improved of course. It is after just 40ish lines of code.
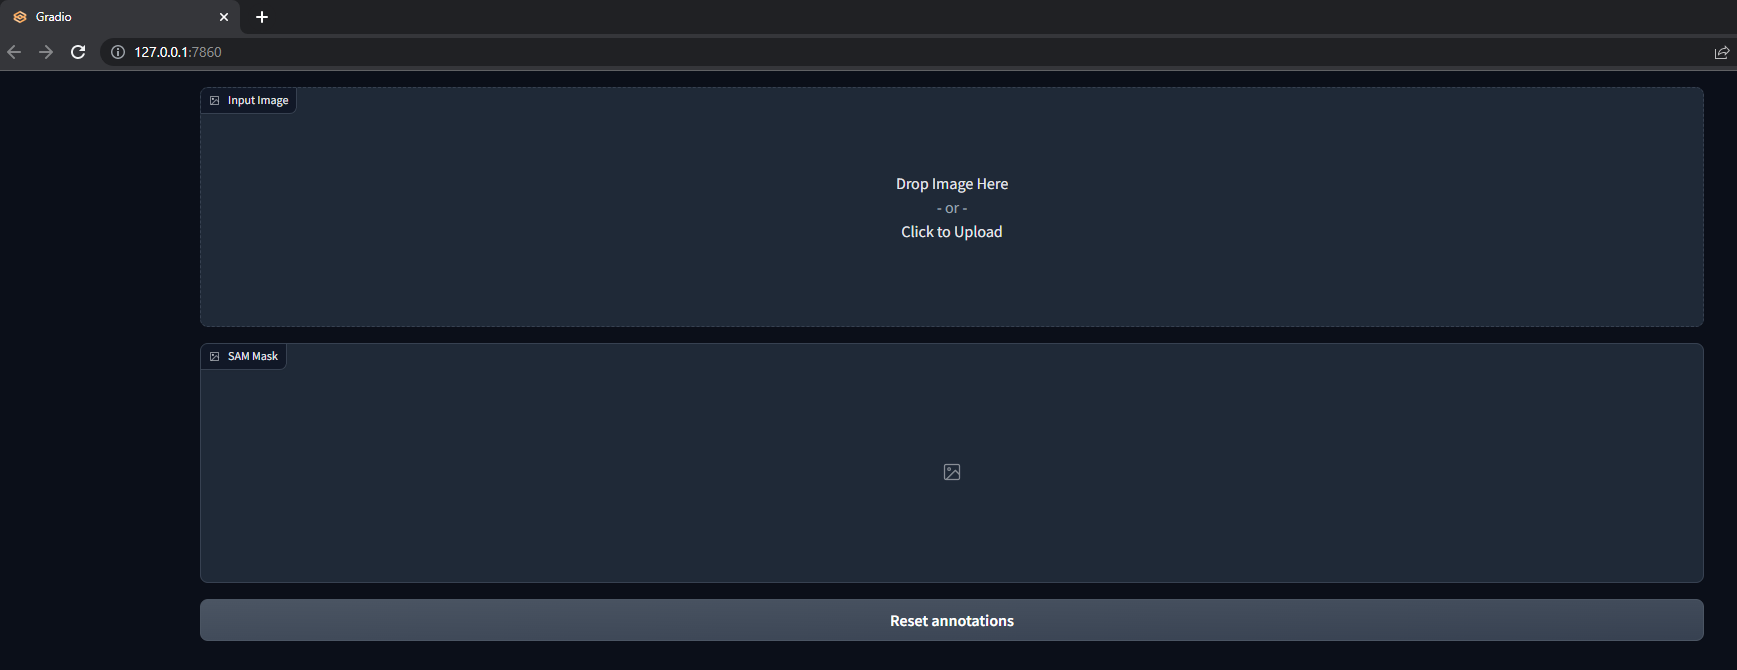
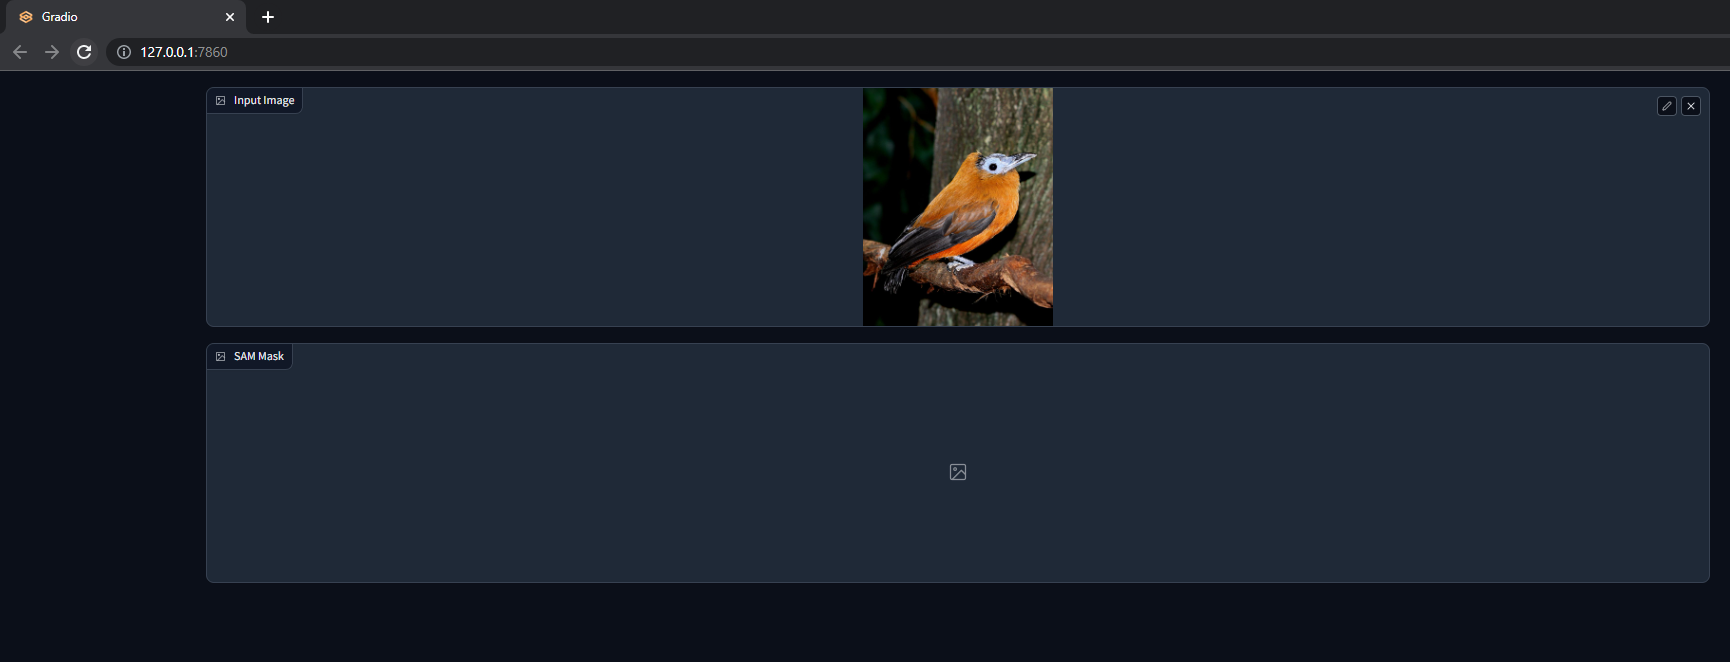
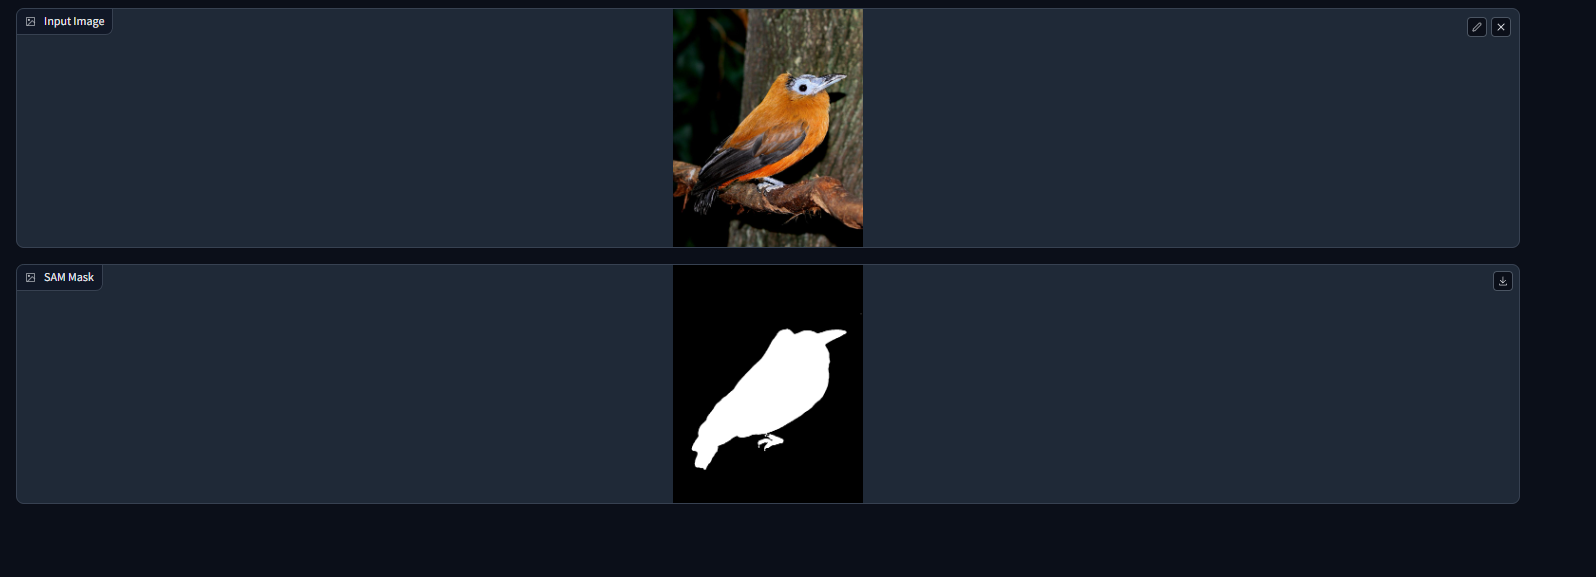
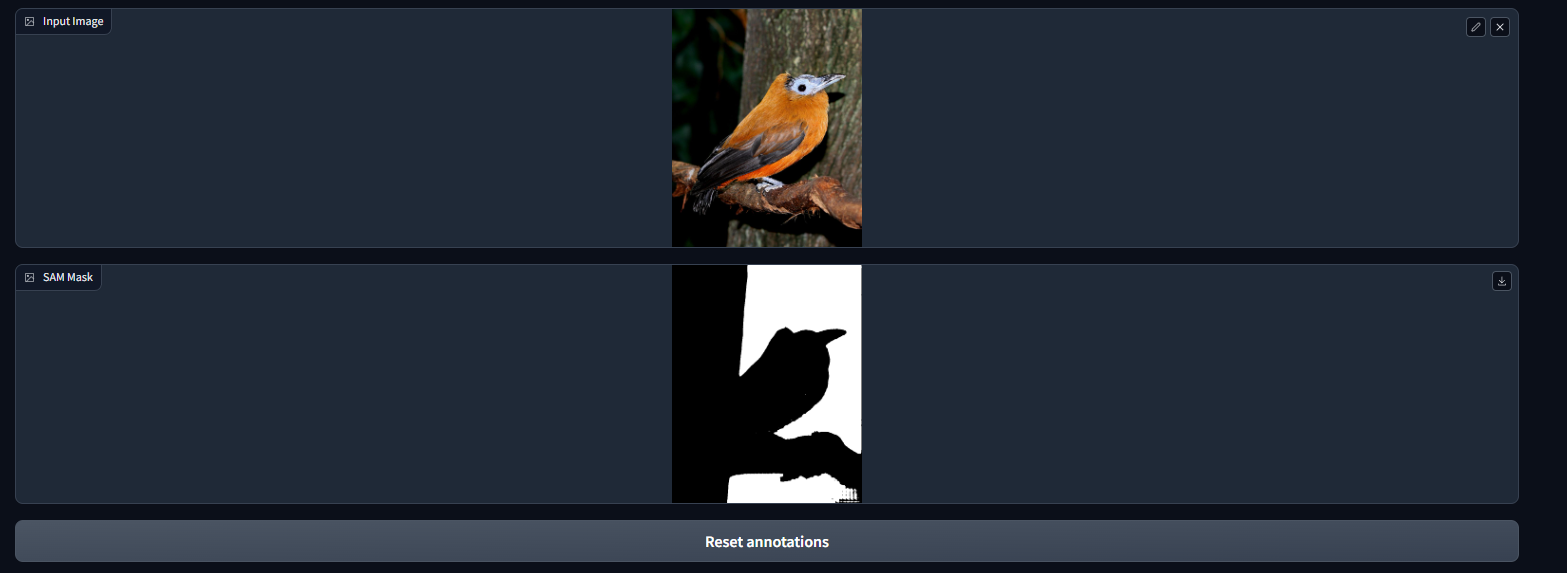
SAM Gradio Example
App with no input
Add an image input, our beloved Capuchin bird
Annotate just the bird
Reset Annotations and select just the tree
Another example