Style Transfer with VGG19
This post is an implementation of the paper Image Style Transfer Using Convolutional Neural Networks by Gatys.
What is Style Transfer?
Style transfer is the ability to apply style of one image to a content of another image. An example for applying style transfer is with the VGG19 which is a CNN with 5 pooling layers and each convolutional layer is a stack of layers.
To obtain the target image, the one with content from one image and style from another, we pass both content and style image through the VGG19.
When passing the content image, the image will go through till the deepest conv layer, where a representation of the image will be the output. Next we pass the style image and the network will extract different features from multiple layers that represent the style of that image. The output will be the merging of content representation and style representation.
The challenge is to get the target image which can start as a blank canvas or a copy of the input image and need to manipulate the style. For the content representation, in the paper, the output is taken from the conv layer 4_2. The output is then compared to the input image.
We need to calculate a content loss which is the mean square loss between the content representation from image and content representation of the target image. This will measure how far apart are the two representation from each other. The aim is to minimize the loss by backpropagation.
Similarly to comparing the content representation and target rapresentation, we do for the style where we need to compare the style representation of the style image and the target image. We basically check how similar features are in the same layer of the network. Similarities will be colors and textures.
By including the correlations of between multi layers of different sizes we can obtain a multi scale style representation of the style image where large and small style features are caught.
The gram matrix defines the correlations. If we have a 4x4 pic passed through the conv layer with 8 of depth, the matrix will have 8 feature maps that we want to find the relationships between.
We basically vectorize (flatten the values).First row in the feature map are the first 4 slot of the vector.
By vectorizing the feature maps we transform a 3D conv layer into a 2D matrix of values. Next we need to multiply this matrix by the Transponse of the matrix
The result will be a 8 by 8 matrix. So for example the value in row 4, column 2, will hold the similarities of the fourth and second feature maps in the layer. Gram matrix is one of the mostly used in practice when doing style.
Same as for content, the style loss is calculated. At each of the 5 layers by comparing target vs style image. We only change the target image.
The total loss is basically the sum of the content loss and style loss. We reduce the loss by backpropagation.
However since the style loss and content loss are calculated differently we need to apply constant weights to each. Normally the constant used for style is much larger than the one for content.
Normally we talk about alfa over beta as ratio. Example of ratio: 1/10
PyTorch Implementation of Style Transfer via VGG19
# import resources
%matplotlib inline

from PIL import Image
import matplotlib.pyplot as plt
import numpy as np

import torch
import torch.optim as optim
from torchvision import transforms, models
Loading VGG19
vgg = models.vgg19(pretrained=True).features

# freeze all VGG parameters
for param in vgg.parameters():
    param.requires_grad_(False)

# Moving to GPU if available
device = torch.device("cuda" if torch.cuda.is_available() else "cpu")
vgg.to(device)
Content and Style Images Loading
def load_image(img_path, max_size=400, shape=None):
image = Image.open(img_path).convert('RGB')
# large images will slow down processing
if max(image.size) > max_size:
size = max_size
else:
size = max(image.size)
if shape is not None:
size = shape
in_transform = transforms.Compose([
transforms.Resize(size),
transforms.ToTensor(),
transforms.Normalize((0.485, 0.456, 0.406),
(0.229, 0.224, 0.225))])
# discard the transparent, alpha channel (that's the :3) and add the batch dimension
image = in_transform(image)[:3,:,:].unsqueeze(0)
return image
# load in content and style image
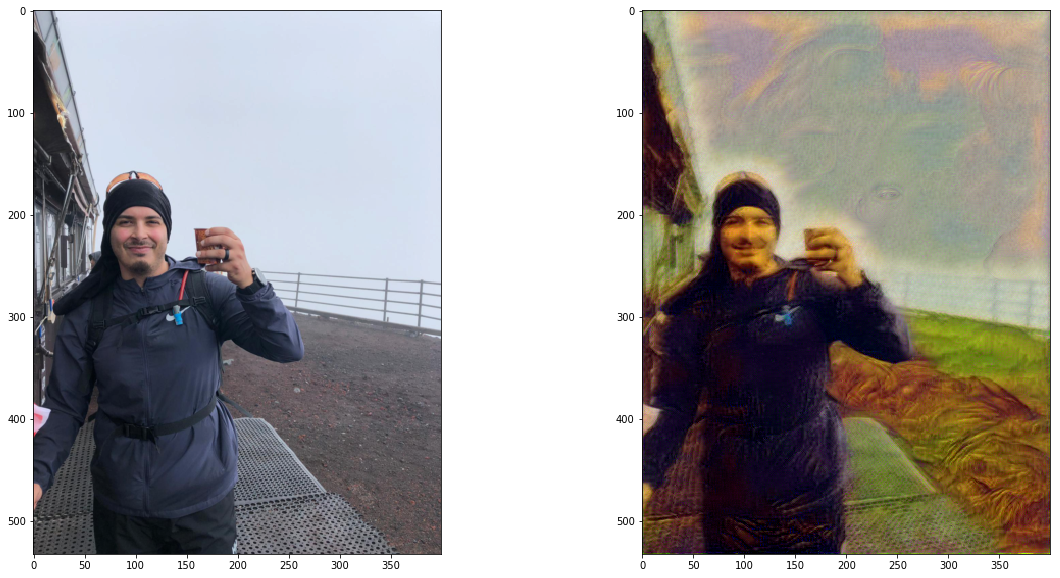
content = load_image('images/IMG-20190704-WA0009.jpg').to(device)
# Resize style to match content
style = load_image('images/gioconda.jpg', shape=content.shape[-2:]).to(device)
Content and Style Features, Gram Matrix
def get_features(image, model, layers=None):

    if layers is None:
        layers = {'0': 'conv1_1', '5':'conv2_1', '10':'conv3_1', '19': 'conv4_1',
                  '21': 'conv4_2', #content representation
                  '28': 'conv5_1'}

    features = {}
    x = image
    for name, layer in model._modules.items():
        x = layer(x)
        if name in layers:
            features[layers[name]] = x

    return features

def gram_matrix(tensor):
    """ Calculate the Gram Matrix of a given tensor
        Gram Matrix: https://en.wikipedia.org/wiki/Gramian_matrix
    """

    batch_size, d, h, w = tensor.size()
    tensor = tensor.view(d, h*w)  #Multiply features for each channel
    gram = torch.mm(tensor, tensor.t())


    return gram
Extracting Features and Gram Matrices calculation
content_features = get_features(content, vgg)
style_features = get_features(style, vgg)

# calculate the gram matrices for each layer of our style representation
style_grams = {layer: gram_matrix(style_features[layer]) for layer in style_features}

# create a third "target" image and prep it for change
# it is a good idea to start of with the target as a copy of our *content* image
# then iteratively change its style
target = content.clone().requires_grad_(True).to(device)

#Excluding conv4_2
style_weights = {'conv1_1': 1.,
                 'conv2_1': 0.7,
                 'conv3_1': 0.5,
                 'conv4_1': 0.3,
                 'conv5_1': 0.2}

content_weight = 1  # alpha
style_weight = 1e6  # beta
LET’S ROLL
# iteration hyperparameters
optimizer = optim.Adam([target], lr=0.003)
steps = 3000  # decide how many iterations to update your image (5000)

for ii in range(1, steps+1):

    target_features = get_features(target, vgg)
    content_loss = torch.mean((target_features['conv4_2'] - content_features['conv4_2'])**2)

    # the style loss
    # initialize the style loss to 0
    style_loss = 0
    # iterate through each style layer and add to the style loss
    for layer in style_weights:
        # get the "target" style representation for the layer
        target_feature = target_features[layer]
        _, d, h, w = target_feature.shape

        target_gram = gram_matrix(target_feature)

        ## get the "style" style representation
        style_gram = style_grams[layer]
        ## Calculate the style loss for one layer, weighted appropriately
        layer_style_loss = style_weights[layer] * torch.mean((target_gram - style_gram)**2)

        # add to the style loss
        style_loss += layer_style_loss / (d * h * w) #normalizes our layer style loss


    ## calculate the *total* loss
    total_loss = (style_loss * style_weight) + (content_loss * content_weight)

    # update your target image
    optimizer.zero_grad()
    total_loss.backward()
    optimizer.step()
OUTPUT EXAMPLE WITH MONA LISA